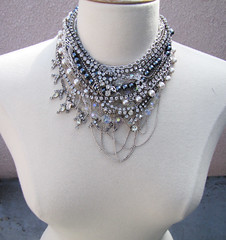
JEWELRY TANGLE CHIC NECKLACE:
Photo source www.lovemaegan.com.
As I looked at jeweler Tom Binn inspired necklaces in a few tutorials for research, I wondered how in the world I was going to find all of that bling to pull this project off. Undaunted, I made a version of this decadent design myself and found that for me, the other tutorials did not completely prepare and explain key details that could make this project easily successful. Here's what worked and how you, too can make one of your own for much less time, money and trouble. Firstly: Most craft stores carry beading supplies and all manner of needful things for this conGLAMeration: varieties of chains from chunky to demure and faux-bulous shades of pearls matching a variety of direction you may take with your desired "of-the-moment" master piece. I found the most delightful pearls in a pewter, graphite color and I almost did a little dance.
... FOLLOW THIS LIFESTYLE BLOG-A-ZINE ...
 Here's what worked:
1. Inventory your necklaces, deciding what tone (silver/gold) you want. I went for the silver in my collection, then supplemented with the craft store chains and bling, mall costume jewelry, re-sale shops, yard sale fodder are also good sources. My own finished design contained about 30% from my unused necklaces.
2. Tools you'll need can include scissors or nail clippers, jewelry pliers x2 if possible. Fireline or other beading thread, not fishing line, for stringing pearls. Use the fishing line as invisible support for key pieces which I'll explain later. Super glue or other clear glue for gluing tied fishing line.


Lay out your necklaces, findings and tools:

It was tricky and colorful-word-annoying trying to weave my necklaces into something gorgeous and I had to put it on my unamused son in order to design easier. This really works best if you can use an elevated surface. If you don't have a statue/bust at your disposal, you may wish to construct this little necklace display tool in order to easily arrange, twist and tangle your pieces. Using a sheet of extra thick craft foam, roll into a tube similar to picture and staple where necessary to hold.
Create:
Your design will fasten on one clasp in the back, so determine a sturdy chain ingredient because you will likely attach key pieces to it here and there. Mine was a 24" silver chain from the bead store which included a clasp closure. I removed links from both sides in the end, reattaching the clasp to shorten. I used it to wrap/reign/weave, also. If this sounds vague, don't worry, it will all make sense as you create.
- Study your inventory of necklaces, the Binns inspiration and others in this blog. Make some portions drapey, put rhinestones off to one side, create a tangled layer, weave portions of chain or pearls throughout to develop a cohesive look.
- Use the fireline if you buy pearls, do not think you can avoid restringing them, you risk having the cheap plastic line they come on breaking and scattering your little pretties...
- Use the fishing line to attach key pieces by tieing ends here and there to other sections of your design. The fireline offers most security here (comes in different jewel tones) but if you want invisible attachment, go for the fishing line and glue the knots carefully, allowing to dry before trimming the ends.
You should end up with something which is more beautiful once you put it on. I rearrange mine some each time I wear it. It's a little wee bit heavy but I love it! It lends a cohesive, fabulosity to dressy outfits and jeans that I live in.


 If you enjoy making DIY necklace projects, this blog post link has a less involved jewelry design projects that are also fun! This one uses ribbon and existing necklace to make re-invent. See the pictures below.
Comments are always welcome =)
Wow such beautiful pieces especially the chic necklace and of course the DIY projects always popular,as there is always so much patience and concentration required to create such beauty.So many great and exciting items of interest. Great presentation as always , cheers , Mal,xx.
ReplyDelete