Sunday, July 26, 2009

Papilio - Butterfly


This time of the year, I paddle my canoe in DeNial, pretending to not notice signs of summer coming to a close. One such sign I'm not noticing is of the butterflies, I'd tell you more but it's easier for me if I stop at the word butterfly and stay with that, leaving out any knowledge of what they are doing to signal summers end. You want to know the signals*? Good luck with that, heheh

These butterfly silhouettes were placed in the House of Dior by artist Andrea Mastrovito and I thought them inspiring for a portion of wall in my home. After doing some research I found a butterfly craft punch and colored papers along with low tack products could yield an interesting wall display. 

this clever papilio is The Butterfly Knife MP3/CD Player Concept  playsMP3s and CD's in a most portable manner by squeezing the CD in the butterfly-knife body while the "player spins the CD in the nude, feeding your naked CD fetish". What?! The device also rips CDs is compatible with Bluetooth headphones.   

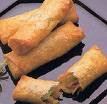
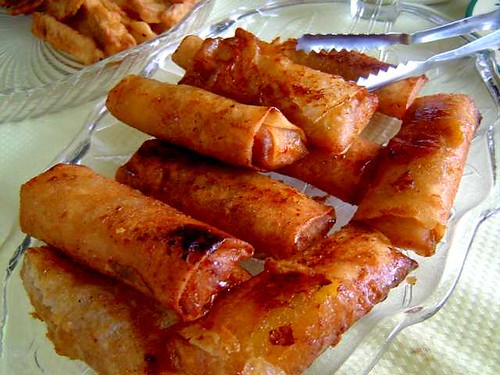
If we were grilling a butterflied chicken would we be distracted about the season coming to an end? Let's see... and for the record, it's summer until September in my book and I don't care about it coming to an end until it is gone. About that chicken: When you
 butterfly a chicken you cut the backbone out to create a flat surface that makes for easier grilling. When grilling a butterflied chicken it helps to bank all the coals on one side of the grill and place the chicken opposite of heat source because it renders the fat under the chicken's skin slowly without causing flare-ups and the gentle heat results in a moister bird. Cooking skin side down reduces cooking time and a final sear directly over dying coals at the end of cooking crisps and browns skin nicely with out the flare-ups. I also place a cast-iron skillet on my bird to increase the flatness. I enjoy an intense lemon flavor so I cut lemons on half and grill alongside of chicken to caramelize and I squeeze the cooled lemon halves over the chicken immediately before eating. You could marinate your chicken after piercing it several times to encourage it to absorb flavor but I found a flavor injector in the cooking store and I use it to penetrate the bird and have flavor through out. For one chicken I use 2T lemon zest, 1/3 c lemon juice, 2 cloves of garlic and puree together before inserting into flavor injector. Inject throughout the bird and on top the bird after preparing the outside with 2-3 T softened butter 2T thyme, 1T rosemary, salt and pepper. I'm a spicy girl and I would sprinkle my bird with red pepper flakes and or cayenne pepper but of course this is not necessary if you are mild mannered, just do the paprika thing for increased coloring. (Yes, I called you a pansy.)

Hmm, we need to have some friends over to enjoy our grilled papilio chicken... if they come in the evening these lovely luminaries would be in order. Use the butterfly punches and decorative bags weighted down with sand or pebbles and containing tea light candles (1 or 2). Scatter these around and create a wonderful ambiance. Using patterned papers you can punch out butterflies and attach them to lanterns, plant leaves and even straws after you cut 2 notches in them to accommodate the straw like what's her name does here.
I lost a butterfly bush this season and so am in the market for a new one. These remarkable bushes are magnets for butterflies. I had a dark knight succumb to the gourmet wishes of a vole. You know that all purple flowers attract butterflies, as does red and in my garden I plant monarda and scabiosa as butterfly lure. (here ya go*)I still have not told you how butterflies let me know about the end of the season. I live in the Rockies, Monarchs visit the milkweed plants for a bit of end season vavavoom (is that 1 word or 3?) and the females lay eggs on the underside of the plants. So, when I see the milkweed all ripe and ready and the butterflies scampering saying suggestive things like "Wanna see my proboscis" - I know the end of summer is near. Felted butterfly sachets never fly away except when you give them as scented gifts, hint, hint. You do know that you can receive updates to this site by subscribing to the RSS, right? Here it has the RSS symbol and the word Posts. If you try anything presented here I'd love to here about it. Feel free to leave a comment on this article =)

Wednesday, July 15, 2009

Paper Work


It’s no wonder I’m thinking about paper when my desk and inbox are inundated.  I am also a little hungry. Combine these and what do you get?  I got cooking papers as in wonton wrappers, lasagne noodle, egg roll wrapper and crepes.  We’ll do something irreverent of course, but I’ll start you out slowly with my favorite: Mexican Crepes.  Let me know if you try any of the ideas presented.  Leave me a comment at the end of this article, I'd love to hear from you.  Try making this incredible dollar shirt and tie, video at the bottom of this article. When you're finished here, try this knit paper towel pattern for clean up. 

I enjoy Mexican foods but I really prefer to eat with a fork rather than having my hands covered with food and bits of it falling out as I eat.  Enter the Mexican Crepe.  The Crepe is tender and easily cut with a fork.  The flavor does not interfere with the Mexican seasonings.  Simply prepare your ground meat as for tacos.  Prepare crepes and add meat mixture and roll like you would a burrito.  That is, place filling in center, 1 inch from either edge: fold the inch edges in on top of filling and then roll one side to the middle and continue rolling tightly until you have a log shape. Layer onto a platter, serve with sour cream, tomatoes, and avocado slices.


Wonton wrappers: just for fun, fold the wonton wrappers into origami cranes. Best to practice with paper first as you can’t overwork the wonton wrapper without it falling apart.  The uncooked wrappers dry out easily so keep unused wrappers covered.  After making a collection of cranes like these or some other simple origami shape, deep fry in oil until golden.  Sprinkle with sea salt if desired.  These are wonderful alongside soup and on an Asian salad as croutons.  Excellent accompaniment to egg drop soup or any soup or salad with an Asian flair.  If you don't feel as ambitious as origami but would still enjoy having a a little fun with wonton wrappers for soups try using your favorite cookie cutter on them and top them with sugar, ground ginger and sesame seeds and cooking spray.  Bake 375 °F until golden.  Even more minimal, do the same seasonings on wrappers cut into thin strips with pizza cutter. 

Slow cooker lasagna:  Using uncooked lasagna noodles, prepare your favorite lasagna recipe like this one for sea food lasagne and layer into your slow cooker, omitting the mozzarella cheese on top.  Cook on low for approximately 5 1/2 hours or until noodles are tender. Sprinke top of lasagna with about 1 c. mozzarella cheese more or less to preferance. Cover and let stand about 10 minutes or until cheese is melted. Cut into pieces.


Oven baked egg rolls.  Using egg roll wrappers, prepare egg roll recipe like this one from Recipezaar but instead of deep frying what could otherwise be a relatively healthy vegetable based snack, spray generously with an oil cooking spray and bake in 375 degree°F oven for  15 minutes, turn with tongs then bake another 15 minutes.  During the summer, consider using your small toaster oven here so that you don’t over heat your home. 


Turon, a Philipino dessert, wraps banana halves in egg roll wrappers and deep fries, adding sprinkles of brown sugar on top after they have been deep fried a golden color.  You and I will bake ours like we did above. What's that? Sounds like bananas Foster?  Couldn't fool you, huh? Well, add some ice cream on the side then  =)

Making the Origami Money Shirt and Tie 
Here is a video for how to make a money shirt and tie.  A simpler dollar shirt origami without the neck tie can be found here.  I first learned this simple one without the tie and have taught children to make it so don't be afraid to give it a try! 


Thursday, July 9, 2009

Vino Bella "Beautiful Wine"


I don't know about you, but I enjoy the occasional glass of wine.  I'm not exactly what one would consider a wine snob and here's proof:  if I open a bottle of wine and don't finish it, I recycle it by adding ice and club soda to it the next day and rather enjoy that, also.  Ratio for me is half bubbly, half wine and sure, you can call it a wine spritzer if you want.  I find it refreshing and so have my guests.   After you drink your wine there's all that stuff left over which have recycle written all over it.  You know, the bottle, the cork, the bladder if you drink box wine... ok, maybe it's not a lot of stuff but you know what?  Recycle it!  Some folks actually save the corks!  Hehe, you knew that didn't you?  I know you know but  I don't believe I've ever seen these put to creative use in real life so I'm am going to throw some ideas out there.  Let me know if you use one of these recycle ideas, ok?  Call me...kidding...just leave me a comment.

That wine bottle, sometimes it comes in a divine color like blue and almost seems shameful to throw it away.  Don't! Clean it out, remove the label, add a cotton ball or a few to slow the flow of the water, then shove a wine pourer thing in the opening. Now, place a finger over the spout and invert the bottle before shoving it into a large thirsty plant.  Will drip water like one of those $15 globes and hold more water. (^_~) I've also done this with the bulbous plastic Pom bottles and pierced the cap and inverted into smaller plant. It was a wonderful, hacked discovery that can come in handy when you are going on vacation.  Corks are also something you can toss into your garden like you would mulch.

Will you look at this?  It's a thumb drive...or flash drive or USB drive or memory stick, WHATEVER! but it's inside of a cork!  You can remove the deco
rative outer case of your existing USB mem stick and strip it to these minimal styles presented.  What every hi-tech wino needs, right?  If you're not all that brave (wimp) you should know that these are available at Smediart but of course if you cut a cork in half, trace the thumb drive with exacto knife and remove cork pulp until you have the proper fit, then match seams and glue closed (removing excess glue with wet cloth) you'd have yourself one, too.  F. F. Coppola designed some just like these and distributed them in 2007 in limited quantities.  This key fob on the right made at RePlayGround gives example to what I mean about the bead and key chain.  RePlayGround also has a kit for this key chain project ava
ilable for $3 each.  

Cut a cork in half and then snug a round cork half up against a book to steady cut a straight line.  Then slice through it, a shallow 1/4 inch with an exacto knife to create a slot - you've made place card holders or savvy way to introduce menu items on your buffet table.  Wine efficienado's have wine stoppers.  A decorative way to create a gallant wine stopper is to attach an ornamental knob such as ones to that go one kitchen cabinets and have a place into the top of the knob allowing one to screw it into a cork with glue on the threads.  Allow to dry completely and you have yourself a stylish wine bottle stopper.
I must admit I find wine glass charms necessary when entertaining one or more friends.  Germaphobe, maybe.   My solution has been to use mix matched wine glasses found at garage sales.  Recently, having collected some sea glass or beach glass, and having a "now what" moment these charms were created.  My sea glass comes from the shores of Lake Eerie but you can purchase sea glass at hobby stores along with any of these elements presented.  Add a  jump ring to a wine glass charm ring then, not too close to an edge or it may break Drill a small hole, then attach the jump ring combo.  All of the sea glass will have different sizes and shapes but when you get to the bottom of your wine glass you may not remember what your charm looked like.  You slush!  This is why I recommend using a metallic paint pen, add a number or letter for distinction.  Hand wash please.

Corks, especially very ornamental ones would also make  fantastic refrigerator magnets. Use length of cork or cut into coins.  Use an exacto to cut and gouge out a small space for a round, super strong magnet and glue it inside of this created space.  It's important to use a strong glue because of the strength of the magnet.  Try Gorilla glue, and follow directions or don't come crying to me.  E6000 is also a good adhesive choice.  Allow generous overnight drying time.  
Knit a gnome outfit...why? Why would anyone do this?  If you knit, you know why (^_~) so here's the pattern.  The pattern is by Manne and translated into English by Saartje. I have knit sillier things...well, maybe not but that doesn't mean you can't.
I recommend using something natural like twine, sisal or hemp for this project. I think you may as well do this, also: make knitting needle point protectors.  You can lend some spiff by adding a beautiful bead with a head pin.  Corks sliced into coins have been used to hold stitches onto needles, crochet hooks also.

Being the inquisitive type, I took apart a wine box and found this great metallic bladder inside.  You'll recall, I'm not a wine snob and Black Box Wines sometimes show up at my house at random but I recommend you use a large box of wine for this project. Box wines are said to be more eco-friendly and several wineries are introducig wines in 3 to 4 liter Bag-in-box (BIB) packaging.  I only use wine in bottles for entertaining ... say that's nice - but doesn't this look like a pillow when inflated? I thought so, too!  By sewing up a terry cloth towel *pillow case and adding suction cup hooks to the top corners or in the center back, this would be a luxurous treat for when you linger in the bathtub or jacuzzi/hot tub.  *pillowcase instructions courtesy Lil Blue Boo

Saturday, July 4, 2009

Mushroom, toad stools and fungi... oh my


I was going to tell you that there was a troll in my garden ... because that is my originally imagined explanation for the mysterious holes in my garden but actually there were little burrowing critters in my garden and you should know that I tried really, very humanely to encourage them to move along.  They couldn’t or wouldn’t read the writing on the wall and I lost my sense of humor when several of my treasured plants began to disappear.  To make a long story longer than it needs to be, I’ll tell you that my champion said “I’ll take care of this for you” and I was so weary that I didn’t ask questions.  Low and oh, my...his solution was to throw what looked like dynamite gas down the holes and kill the critters where they live.  Oh, sure, that ended my critter problem but do you really think that I am going to dig there and come across the creepy remains of some hairy, scare-y dead critter carcass?  “Not I ” said the girly-girl.  On to plan “B”.  I needed a garden element alternative to plants to serve as a place holder and mushrooms came to mind.  I seem to always have a bag of concrete mix lying around my garage because I over purchase so I that don’t run out in the middle of a project.  Of course I have lots of plastic plant pots because I kept replacing the specimens those darn critters were eating.  I also have sand and if you don’t you can pick some up at the local hardware store or do as I do and take some from the local park.  We also need a gargantuan nail stake from the hardware store.  They may call them something else there but don't you get all technical on me, ok?  The point is to get a large thick nail, bolt, or section of re bar to serve as a sturdy stem base.  After gathering your supplies but before you begin, I highly recommend that you read the instructions first.  You'll need to work in an area where you can leave your project undisturbed while drying.  This project can be made with hypertufa.  Find Tufa recipe found at this site under Mud Wrestling (June10, 2009).
  1. Sand cast mold: Using plastic 4” plant container, tape drainage holes to seal, then fill half way with sand and moisten sand with water until damp enough to pack sand against walls of container.  Shape into a cone for mushroom.  
  2. Stylize ideas
    1. using an index card make stripe indents
    2. take a knife and trace a jagged spiral pattern into sand 
    3. pencil eraser to texture indents on the surface adding very tiny pebbles, leaves or other organic matter to make an impression in the cement.
    4. Press a simple cone shape or round shape into the sand and carve and sculpt after cement has set up some.
    5. Make a round toad stool, you can also dig a hole in the ground and follow same instructions.
  3. Mix a small batch of cement and pour into your sand mold cement, add a large and long nail to center that will become a sturdy stem later
  4. when cement mushroom base has set up some, add a semi-dry cement around nail to form stem.  No need to make it stick straight either, try an undulating or hourglass molded shape here.
  5. Allow to dry undisturbed 24 hours or as needed. Unearth and gently brush sand or soil away with an old toothbrush or paint brush and viola. 
Finishing touches:  One idea is to create a cluster of cement mushrooms and "plant" atop of a mound of almost dry cement and allow to set like the ones below on the left.  Plan ahead and create an indention into the cap by adding packed sand into an area that later use will accommodate succulents to grow atop the mushrooms such as in middle photo. Scrape the mushrooms or add more concrete to the unearthed pot mushrooms to get a product similar to the mushroom on the right.  Consider adhering moss or using a sponge to dab on color/s with patio paint. If you prefer more color mushroom, then by all means paint. =)  


Hungry?  This hard work calls for food.  This little wonderful mushroom, rice, lentil timbale (kitchen geek term) is prepared in little ramekins to be eaten with a fork or used as an appetizer spread along side your favorite crackers.  I adapt a previously adapted recipe for these Mushroom Timbales  for a simple and delicious vegan dish that is both hearty and elegant.  Don't go getting squeamish on me because this dish includes tofu which is a source of protein and calcium.  Tofu is a staple in Asian cuisine that you will find in the produce section of your regular grocery store.  Tofu is made from soybeans which have been indicated as a Japanese longevity secret

Ingredients
1 large finely chopped onion, I like red onion
2 large slices bread (may be gluten-free) I use a whole multi grain type
2 cups mushrooms, quartered (about 10 large), button mushrooms are fine choice
1/2 cup silken tofu (light, firm or extra-firm Mori-Nu, preferred)
3 cloves garlic, quartered
1 tablespoon sherry
2 tablespoons water
1 cup lentils, cooked or favorite cooked bean such as white beans or black beans
1 tablespoon tomato paste
1/4 teaspoon minced fresh rosemary (dry will substitute)
1/2 teaspoon dried thyme
1/2 teaspoon rubbed sage
3 tablespoons cornstarch, or arrowroot
1 teaspoon salt
1 cup cooked wild rice or brown rice
salt and freshly ground black pepper
sliced mushrooms for garnish (optional) use a very eye pleasing mushroom such as a spread of Enoki*, or a plump straw mushroom. *I find enoki in Asian markets.

Make ahead: 1 cup cooked lentils (from about 1/2 cup dried) and 1 cup rice (about 1/2 cup before cooking)

  1. Preheat oven to 350F. Spray 6 ramekins with cooking spray and have ready a large baking pan that will hold them (9x13-inch should work). Place one nice-looking mushroom slice in the bottom of each ramekin.
  2. Saute the onion in a non-stick pan until it softens. Set aside.
  3. Place bread in food processor and pulse until you have crumbs. Add mushrooms, tofu, garlic, sherry, and water blending until fairly smooth. Add lentils and process again until smooth. Add the tomato paste, herbs, cornstarch, and salt - processing until well-blended. Add the onions to the processor and pulse to incorporate taking care not to over-process in order to retain some texture.
  4. Scrape contents from food processor into a bowl and stir in the cooked rice. Season with salt and black pepper to taste.
  5. Divide the mixture among the oiled ramekins and smooth the tops with a spoon. Set the ramekins in the large baking dish and add hot water to the dish, being careful not to splash it into the ramekins.
  6. Bake, uncovered, until tops are brown and crusty and middles seem moderately firm when pressed with a finger--about 45-50 minutes. Remove from the oven and allow to cool for 10 minutes. Run a thin knife around the edges and invert the ramekins onto serving plates. Serve with your favorite mushroom gravy.
Note: If you plan to serve these later, keep the timbales in the ramekins, covered, and reheat in their water bath for about 10 minutes. Or (guessing now) microwave each for about a minute before serving.